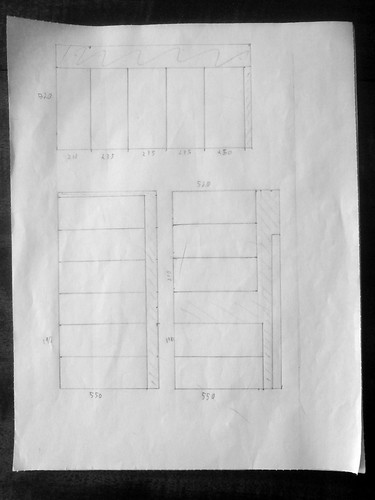
I measured the cupboard and considered how much clearance the drawers would need from either side to ensure there wouldn't be any problem opening them, then rounded the remaining space down to a convenient width of 520mm:

The sides will be shorter than the gaps; the back panel will be slightly tall (a lip at the top), to prevent the drawer being pulled out accidentally; and the front panel will cover half of the framework horizontals above and below it, except the top drawer which will cover all of the top horizontal.
The rear and sides will be connected with box joints, and the front and sides with rabbet joints. The drawer bottom will use dado joints, which will be get nailed and/or glued as well.
Now I know what sizes I need, I can work out a bill of materials, specifying all the parts I need.
Drawing up plans at home is fine, but has a problem in that you can't be sure what materials will be available in the shop. The online guides to making drawers I read suggested ply for the sides and bottoms - but the shop didn't have thick enough ply for the sides, so I picked MDF instead. Hopefully it'll be strong enough!
Once I got my newly purchased two sheets of ply and three sheets of MDF home, I was able to plan how to get the most out of them. Unfortunately there didn't seem to be a way to waste less, but I did get a bit to use as fascia beside the drawers. Different drawer sizes might have been more efficient, but it would have turned into differential equations, and that would be taking it too far...
Ideally I'd be cutting all of these bits of wood with a table saw, which would be quick, and should help keep edges straight, distances consistent, and angles correct. I don't think I've got the space for a table saw, even if I did think I'd be able to justify it.
Maybe a circular saw, which would be better than cutting everything by hand saw? Nah, still don't think I can justify it.
I had heard about the Dremel multi-tool, which is meant to do cutting, routing, sanding - you name it - and thought that it would do a lot without needing a lot of storage space. It sounds like it would be adaptable to a range of things I'll want to do for this and other projects (my LED guitar for one).
It should cutting box joints, and routing for rabbet and dado joints - I'll have one. In fact I'll also have the pillar drill accessory which I'm bound to use - maybe even instead of the router accessory.
Well, when I tried some cutting, the shape of it meant I couldn't get the right angle, and the cutting disc snapped (I think that's an intentional safety feature). So I'm back to the hand saws. Sawing the boards by hand didn't take too long, but did require a lot of edge shaving, to square everything up.
The next task is box joints, with tenon saw, hack saw, and file. If it was real wood I'd chisel it, but I expect MDF would split in all sorts of horrible ways.
After one box joint the build stalls for a while, because it feels like I'll be sawing for ever. There may have been a rather entertaining a party and a few nights out that took away some momentum as well. Anyway, a few evenings later the mood strikes me again and in just two evenings I get all the other box joints done, with the ply cut to size for the drawer bottoms as well. Progress :-)
Drawer parts with cuts for box joints:
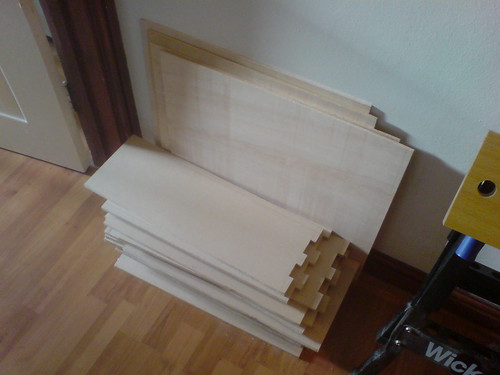
Those MDF pieces are missing some important cuts: The rabbet joints where the front attaches to the sides, and the dado joints where the bottom fits into the front back and sides. I haven't the skill/patience do those accurately with just hand tools, so I do need a router.
The Dremel can do routing, but it's too wild to use freehand making a dado joint. Using pillar drill accessory as a router looked risky as well, so I went and ordered the router attachment. On the plus side, waiting for delivery of the router gizmo meant I started writing this stuff up...
No comments:
Post a Comment